Pages

Wednesday, September 11, 2013

Fun with Flubber


So I know Flubber has been around for like...  ever!  But, I just recently discovered it via, yes, you guessed it...  Pinterest :-)
 
Well, Natalie and I whipped some up the other day and it was a BLAST!
 
I don't remember the exact recipe I used, but I ended up adding a lot more Borax than it called for.  It was super sticky at first but the more Borax I added the better it was.
 
Here are some more pictures...  One minute it's fabulous and the next it's gross ;-)


Monday, June 24, 2013

4th of July Rag Wreath

 
I love making Rag Wreaths!  (See below for others I have made)  They are very easy but a little time consuming.  Usually I sit on the floor to make them which gives me a back ache....  (post coming soon on how to help with aches and pains, yay!)
 
Anyway, rag wreaths are simple to make and I'm sure there are plenty of tutorials out there that explain everything step by step so I'll keep this short and sweet :-)
 
The wreath base is one I got from the Dollar Tree.  Unfortunately they don't carry them anymore or I would buy every one I could get my hands on!!!
 
The fabric is just quilting strips, cut and then tied around the wreath in a basic knot.  Just for a little something extra, I curled the ends of the fabric, just like you would on the ribbon of a present.  It makes kind of shabby, don't ya think?
 
I used star stickers that I had on hand (sorry I didn't have 50 of them)...haha
 
The "God Bless the USA" sign is just a piece of sturdy cardboard painted white and then I free-handed the words with a sharpie (I know, not very original but oh well, I like it)  Then I super glued the cardboard to the back of the wreath. 
 
That's it, really!!!  Super easy
 
 
Valentine's Day
 
Valentine's Day II

Spring

St. Patrick's Day


Wednesday, June 19, 2013

Fairy Garden

How to make your very own "Fairy Garden" (by: Natalie)


First you start with some kind of base.  We used a container that plants come in but you could use any type of plastic box or bowl.

We added some potting soil and started adding plants.  We added mostly succulents and a few flowering plants and moss.

Next we put in some sand and tiny pebbles.  Then we put bigger rocks on top to make the walkway.  We used old thread spools for a tiny table and chairs.

Last, we put in a small wooden house that we made (kit from Lowe's).  It was decorated like a gingerbread house, but the fairies like it anyway ;-)

Oh, we also put in a large shell upside down and made the fairies a pool!

Right now the fairies are inside the house resting from their day in the pool and their wings are drying in the sun.  (everyone knows that fairies can't fly with wet wings)

Have fun, be creative! 

Tuesday, May 21, 2013

Cardigan to shrug

So today I decided that I need a shrug.  I looked online for one but unfortunately they all cost money...haha.  Well, more money than I am willing to spend on such an item.

Cue Pinterest...  I found this great tutorial for making a shrug from an old cardigan, bingo!  That's what I'm talking about!
  
Here are my before and after photos and a link (click here) to the tutorial.  (I omitted the collar because I like the collar on my cardigan)


I hope you enjoy yours as much as I do mine!  Have a great day! 


Saturday, May 4, 2013

Relay for Life

Miss Natalie’s Girl Scout Troop participated in our local Relay for Life last night.  This was an emotional experience for us.  Too many people in our lives have been affected by cancer.  Events like this always bring out the best in people and it was really nice to see our community come together to support this cause.  We were very grateful to be able to attend this event and support the American Cancer Society.  For more information please visit www.relayforlife.org, there is a wealth of information on this site.

As you can probably tell from this picture, it was COLD last night L  We are sooo ready for summer!!!

Wednesday, May 1, 2013

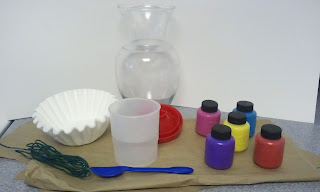
Coffee Filter Flower Bouquet

Coffee Filter Flower Bouquet


Our first tutorial comes from Natalie (Butterfly 3).  This is a very simple art project that is fun for all ages! 

Supplies Needed:
round coffee filters
green pipe cleaners or floral wire
water based paint
small amount of water
vase
spoon
paintbrush
newspaper/packing paper to cover your work space

Steps to complete:
1.  Lay out paper to cover your work space
2.  Take one coffee filter and flatten it onto the paper
3.  Gently drip water onto coffee filter with spoon
4.  Lightly paint coffee filter with water based paint 
5.  Repeat process for as many flowers as you want

6.  Allow coffee filters to dry completely
     (eat powdered donuts while you wait - optional)
7.  Once the filters are dry, gently pinch the middle to form a flower shape


8.  Use pipe cleaners or have an adult cut floral wire to desired length and make a loop at one end to hold each flower


9.  Insert flowers into vase filled with stones, pebbles (just something to hold them upright)
 
10.  Enjoy your beautiful handmade flower arrangement that will live forever!
 
 
Thanks for stopping by today!  We hope you enjoy making these as much as we did!
 

Tuesday, April 30, 2013

Welcome

Welcome to our blog!  We are very excited to be up and running. 

We are three generations here to share our thoughts, ideas and inspirations.  We each have varied creative interests such as painting, sewing, music, gardening, decorating, cooking, etc (this list could go on forever)...  We love trying new things to discover our hidden talents and passions.  You will find a little bit of everything on this blog and we welcome ideas and suggestions in our comment section. 
 
Thank you so much for stopping by and be on the look out for our next post very soon! 

 
Butterfly number 3 (pictured here) is the most excited about this blog.  You will definitely be seeing lots of pictures of her in the future as she has self-proclaimed herself as our model :)